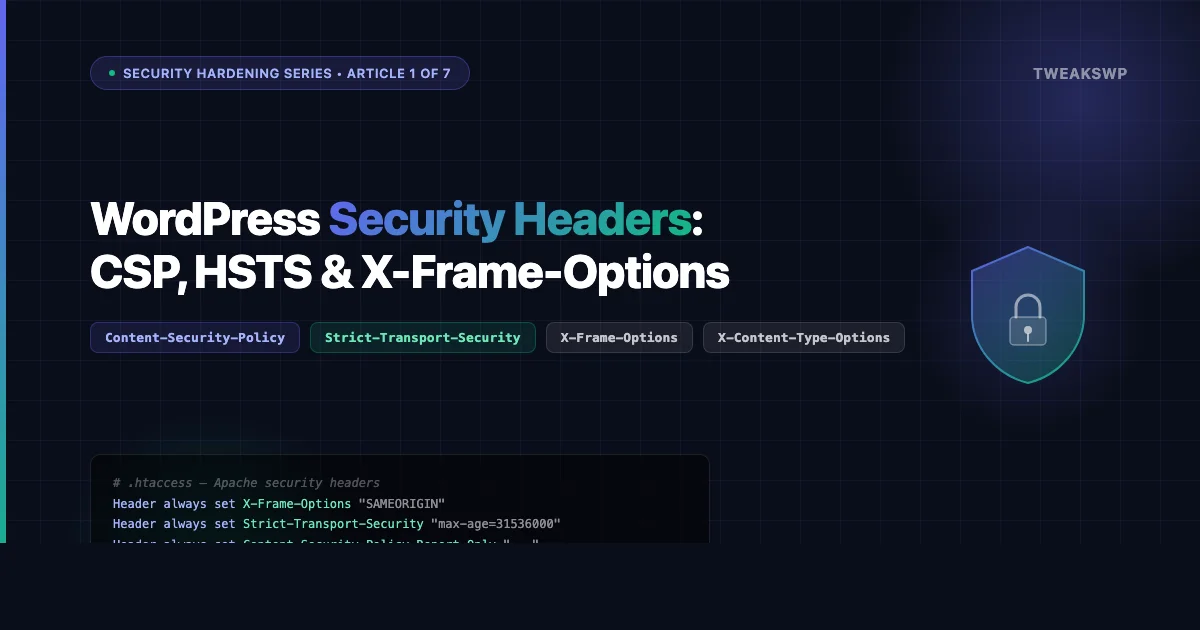
WordPress Security Headers: How to Add CSP, HSTS, and X-Frame-Options

HTTP security headers are one of the fastest, lowest-effort hardening steps you can take on a WordPress site. One block in .htaccess or a few lines in nginx.conf can stop clickjacking, MIME sniffing, and mixed-content attacks without touching a single plugin.
This guide walks through every header that matters for a WordPress site in 2026: what each one does, the exact directives to copy, the gotchas that will break your admin or embed previews, and how to verify your score before you call it done. Before adding headers, it helps to run a baseline check using a tool like the WordPress site security audit workflow covered in our quick-audit guide.
Why Security Headers Matter for WordPress
A WordPress site that scores an A on securityheaders.com tells browsers exactly what it is and is not allowed to do. Without these headers, browsers fall back to permissive defaults: they will execute inline scripts from any origin, allow your pages to be iframed by any site, and trust whatever MIME type a response claims to be.
- Clickjacking, an attacker embeds your login page in a transparent iframe and captures credentials. X-Frame-Options and the
frame-ancestorsCSP directive prevent this. - XSS amplification, a Content Security Policy blocks injected scripts from phoning home even if an XSS vulnerability exists.
- Protocol downgrade, HSTS forces browsers onto HTTPS permanently, defeating SSL-strip attacks.
- MIME confusion, X-Content-Type-Options stops browsers from executing a mistyped script or stylesheet.
None of these headers require a plugin. They belong at the server layer, which is exactly where security controls should live. For additional server-level configuration, see our guide on WordPress security hardening with wp-config and server tweaks.
Method 1: Apache .htaccess
If your host runs Apache (most shared hosts and Local by Flywheel do), open your root .htaccess and add this block above the # BEGIN WordPress line:
<IfModule mod_headers.c>
    # Prevent clickjacking
    Header always set X-Frame-Options "SAMEORIGIN"

    # Block MIME sniffing
    Header always set X-Content-Type-Options "nosniff"

    # Control referrer information
    Header always set Referrer-Policy "strict-origin-when-cross-origin"

    # Restrict browser features
    Header always set Permissions-Policy "geolocation=(), microphone=(), camera=()"

    # Force HTTPS, add only after SSL is confirmed working
    Header always set Strict-Transport-Security "max-age=31536000; includeSubDomains"

    # Content Security Policy, start in report-only mode
    Header always set Content-Security-Policy-Report-Only "default-src 'self'; script-src 'self' 'unsafe-inline' 'unsafe-eval'; style-src 'self' 'unsafe-inline'; img-src 'self' data: https:; font-src 'self' data:; connect-src 'self'; frame-ancestors 'self'"
</IfModule>
Note the use of Content-Security-Policy-Report-Only instead of Content-Security-Policy. Start in report-only mode while you audit what your site loads, switching to enforcement before you know every source your theme and plugins use will break things.
Method 2: Nginx
On Nginx, add these directives inside the server {} block for your WordPress site, typically in /etc/nginx/sites-available/your-site.conf:
server {
    # ... your existing SSL and root config ...

    add_header X-Frame-Options "SAMEORIGIN" always;
    add_header X-Content-Type-Options "nosniff" always;
    add_header Referrer-Policy "strict-origin-when-cross-origin" always;
    add_header Permissions-Policy "geolocation=(), microphone=(), camera=()" always;
    add_header Strict-Transport-Security "max-age=31536000; includeSubDomains" always;
    add_header Content-Security-Policy-Report-Only "default-src 'self'; script-src 'self' 'unsafe-inline' 'unsafe-eval'; style-src 'self' 'unsafe-inline'; img-src 'self' data: https:; font-src 'self' data:; connect-src 'self'; frame-ancestors 'self'" always;
}
After editing, test with nginx -t and reload: systemctl reload nginx. The always keyword ensures headers are sent even on error responses.
Method 3: PHP via WordPress (functions.php or mu-plugin)
If you do not control the server config, common on managed WordPress hosts like WP Engine, Kinsta, or Pressable, you can send headers from PHP. Add this to a must-use plugin (wp-content/mu-plugins/security-headers.php) so it runs before themes can interfere:
<?php
/**
 * Security Headers, MU Plugin
 * Runs on every request before output starts.
 */
add_action( 'send_headers', 'twp_send_security_headers' );

function twp_send_security_headers() {
    if ( headers_sent() ) {
        return;
    }

    header( 'X-Frame-Options: SAMEORIGIN' );
    header( 'X-Content-Type-Options: nosniff' );
    header( 'Referrer-Policy: strict-origin-when-cross-origin' );
    header( 'Permissions-Policy: geolocation=(), microphone=(), camera=()' );

    // Only send HSTS on HTTPS requests
    if ( is_ssl() ) {
        header( 'Strict-Transport-Security: max-age=31536000; includeSubDomains' );
    }

    // Start with report-only CSP
    header( "Content-Security-Policy-Report-Only: default-src 'self'; script-src 'self' 'unsafe-inline' 'unsafe-eval'; style-src 'self' 'unsafe-inline'; img-src 'self' data: https:; font-src 'self' data:; connect-src 'self'; frame-ancestors 'self'" );
}
The send_headers action fires early in the WordPress request cycle, before template output begins, making it the correct hook for HTTP response headers.
Content Security Policy: The Header That Breaks Things
CSP is the most powerful header and the one most likely to break your site if you skip the audit step. Here is what a production-safe CSP looks like for a typical WordPress site using Gutenberg:
Content-Security-Policy:
  default-src 'self';
  script-src 'self' 'unsafe-inline' 'unsafe-eval';
  style-src 'self' 'unsafe-inline';
  img-src 'self' data: https:;
  font-src 'self' data: https://fonts.gstatic.com;
  connect-src 'self' https://api.wordpress.org;
  frame-src 'self' https://www.youtube.com https://player.vimeo.com;
  frame-ancestors 'self';
  base-uri 'self';
  form-action 'self';
Why ‘unsafe-inline’ and ‘unsafe-eval’ are Required for WordPress
WordPress core, Gutenberg, and most plugins output inline <script> blocks and use eval() internally. Without 'unsafe-inline' and 'unsafe-eval', the block editor, widget screen, customizer, and most page builders will fail silently or show blank screens.
The correct approach for production WordPress sites is to use a nonce-based CSP, WordPress 6.3+ supports this via wp_get_inline_script_tag(), but that requires custom implementation per plugin. For most sites, 'unsafe-inline' is the pragmatic middle ground that still blocks external script injection.
Third-Party Services That Need CSP Allowlisting
| Service | Directive to add |
|---|---|
| Google Analytics 4 | script-src https://www.googletagmanager.com; connect-src https://www.google-analytics.com |
| Google Fonts | font-src https://fonts.gstatic.com; style-src https://fonts.googleapis.com |
| YouTube embeds | frame-src https://www.youtube.com https://www.youtube-nocookie.com |
| Cloudflare Turnstile | script-src https://challenges.cloudflare.com; frame-src https://challenges.cloudflare.com |
| Stripe | script-src https://js.stripe.com; frame-src https://js.stripe.com |
HSTS: HTTP Strict Transport Security
HSTS tells browsers to always use HTTPS for your domain, even if someone types http:// in the address bar. Once a browser receives the header, it refuses to make an insecure connection to your domain for the duration of max-age (in seconds).
Strict-Transport-Security: max-age=31536000; includeSubDomains; preloadmax-age=31536000, one year. Browsers remember this even after the header stops being sent.includeSubDomains, applies HSTS to all subdomains. Only add this if every subdomain (includingstaging.*) runs on HTTPS.preload, required for preload list submission, but do not add it until you are certain you want permanent HTTPS enforcement.
HSTS Preload: How to Submit Your Domain
The HSTS preload list is a hardcoded list inside Chrome, Firefox, Safari, and Edge of domains that must always be accessed via HTTPS. Getting on it takes a few steps:
- Confirm your site has a valid SSL certificate and serves all content over HTTPS.
- Add the header with
max-ageof at least 31536000 (one year),includeSubDomains, andpreload. - Verify all subdomains redirect to HTTPS and have valid certs.
- Visit hstspreload.org and submit your domain.
- Approval takes weeks to months. Removal takes months, the preload list is a one-way commitment.
Start with max-age=300 (5 minutes) while testing. Ramp to max-age=86400 (one day), then max-age=31536000 once you are confident. If you lock yourself out of HTTP before your SSL cert is renewed, users will see connection errors with no bypass option.
X-Frame-Options: Clickjacking Protection
X-Frame-Options controls whether your pages can be loaded inside an <iframe>. Three values exist:
DENY, no framing, period. Use on login pages.SAMEORIGIN, only your own domain can frame your pages. Safe default for most sites.ALLOW-FROM https://example.com, deprecated; not supported in modern browsers. Use CSPframe-ancestorsinstead.
Gotcha: X-Frame-Options Blocks Your Own Embed Previews
If you use oEmbed or WordPress’s built-in embed preview (the card that appears when you paste a URL in the block editor), setting X-Frame-Options: DENY will break it. The Gutenberg embed block previews your own posts in an iframe, SAMEORIGIN still allows this, but DENY will show a blank embed.
Similarly, if you run ads or affiliate widgets that load your pages in iframes from external domains, you will need to use CSP frame-ancestors with specific allowed origins rather than X-Frame-Options.
X-Content-Type-Options: Stop MIME Sniffing
MIME sniffing is where a browser ignores the declared Content-Type and tries to guess what a file is based on its contents. This lets attackers serve a malicious script disguised as an image.
X-Content-Type-Options: nosniffThis header has one value: nosniff. It applies to scripts and stylesheets specifically, if a browser requests a script and the server sends a non-JavaScript MIME type, nosniff forces the browser to reject it.
Referrer-Policy: Control What You Share
The Referer header (yes, the historical misspelling) tells sites where a visitor came from. Without a policy, clicking from your HTTPS site to an HTTP site sends the full URL, including any query parameters that might contain tokens or session IDs.
| Value | What gets sent | When to use |
|---|---|---|
no-referrer | Nothing | Maximum privacy, breaks some analytics |
strict-origin | Origin only on same-protocol | Privacy-first, no path or params exposed |
strict-origin-when-cross-origin | Full URL same-origin; origin-only cross-origin | Good balance, recommended default |
unsafe-url | Full URL always | Never use |
Use strict-origin-when-cross-origin for most WordPress sites. It gives Google Analytics accurate referral data for internal navigation while preventing full URLs from leaking to external domains.
Permissions-Policy: Lock Down Browser APIs
Permissions-Policy (formerly Feature-Policy) lets you disable browser APIs that your site does not use. If your WordPress site does not need camera access, there is no reason to leave that API available to injected scripts.
Permissions-Policy: geolocation=(), microphone=(), camera=(), payment=(), usb=(), interest-cohort=()Empty parentheses () mean the feature is disabled for all origins. If you need geolocation for a store locator, use geolocation=(self) to allow it only from your own origin.
The interest-cohort=() directive opts your site out of Google’s FLoC tracking (now deprecated but still worth including).
Testing Your WordPress Security Headers
Two free tools give you an objective score:
securityheaders.com
Enter your URL and get a letter grade (A+ to F) plus a breakdown of which headers are present, missing, or misconfigured. The most common reasons sites miss an A+ are a missing CSP or missing HSTS. Aim for at least a B before going to production, and an A after you work through your CSP allowlist.
Mozilla Observatory
Mozilla Observatory scores on a 100-point scale across more checks, including subresource integrity and cookie flags. It also gives specific guidance on what to fix. Run it at observatory.mozilla.org after making any header change.
You can also test headers from the command line:
curl -sI https://yoursite.com | grep -i 'x-frame\|x-content\|strict-transport\|content-security\|referrer\|permissions'Moving CSP from Report-Only to Enforcement
Once you have run your site in Content-Security-Policy-Report-Only mode for a week and checked your browser console for violations, you are ready to enforce. The process:
- Open your browser console and look for CSP violation messages. Each one tells you exactly what source was blocked and which directive to add.
- Update your CSP string to include every legitimate source you found.
- Change the header name from
Content-Security-Policy-Report-OnlytoContent-Security-Policy. - Reload your site and immediately test: home page, a single post, the WordPress admin, and the block editor.
- If the block editor breaks, check for
script-srcviolations, you may need to add a specific domain you missed.
Common sources that catch sites by surprise: Google Tag Manager loading third-party scripts, WooCommerce checkout scripts from payment providers, contact form scripts from HubSpot or Mailchimp, and social share buttons loading from Facebook or Twitter CDNs.
Quick Reference: All Headers in One Block
Here is the complete .htaccess block you can use as a starting point:
<IfModule mod_headers.c>
    Header always set X-Frame-Options "SAMEORIGIN"
    Header always set X-Content-Type-Options "nosniff"
    Header always set Referrer-Policy "strict-origin-when-cross-origin"
    Header always set Permissions-Policy "geolocation=(), microphone=(), camera=(), payment=(), usb=()"
    Header always set Strict-Transport-Security "max-age=31536000; includeSubDomains"
    Header always set Content-Security-Policy-Report-Only "default-src 'self'; script-src 'self' 'unsafe-inline' 'unsafe-eval'; style-src 'self' 'unsafe-inline'; img-src 'self' data: https:; font-src 'self' data: https://fonts.gstatic.com; connect-src 'self'; frame-src 'self' https://www.youtube.com https://player.vimeo.com; frame-ancestors 'self'; base-uri 'self'; form-action 'self'"
</IfModule>
After verifying with securityheaders.com and resolving CSP violations in your console, swap Content-Security-Policy-Report-Only for Content-Security-Policy and add preload to your HSTS header only once you are committed to permanent HTTPS.
Next Steps in This Security Series
Security headers are article 1 of 7 in the TweaksWP Security Hardening series. Coming up next: disabling XML-RPC and REST API endpoints you do not need, hardening file permissions, and configuring WordPress salts and secrets rotation. Each article in the series builds on the server-level controls covered here.
If you run into CSP violations you cannot identify, paste the violation message from your browser console in the comments, the error output tells you exactly which script or resource triggered it and gives enough context to diagnose the source.