In WordPress, the header is a critical component of your website’s design, often serving as the first impression for visitors. While many themes allow for a single line of text in the header, there are times when you might want to include two lines of text. Whether it’s for a tagline, business slogan, or additional information, having two lines of text in your WordPress header can enhance the visual appeal and clarity of your site. In this blog post, “How to Have 2 Lines of Text in WordPress Header,” we’ll walk you through the steps to achieve this, ensuring a professional and polished result.
Why Use Two Lines of Text in Your Header?
Using two lines of text in your WordPress header can be beneficial for several reasons:
- Enhanced Clarity: Two lines allow you to separate your site’s name from a slogan or additional information, making it easier for visitors to understand your brand’s message.
- Better Design Flexibility: This approach provides more space for creativity, allowing for distinct typography and layout choices that can make your header stand out.
- Improved SEO: A well-structured header with relevant text can contribute to better SEO, as it provides additional context about your site’s content.
Also Read: How to Restore WordPress Category
Steps to Have 2 Lines of Text in a WordPress Header
Here are the steps to 2 lines of text in a WordPress header:
Step 1: Choose the Right Theme
Before you start, it’s important to ensure that your WordPress theme supports customization of the header area. Some themes have built-in options to add multiple lines of text, while others may require custom coding.
- Check Theme Documentation: Review your theme’s documentation or settings panel to see if it offers an option to add multiple lines of text in the header.
- Consider a Theme Upgrade: If your current theme doesn’t support this feature, you might need to consider switching to a theme that does. Themes like Astra, OceanWP, or Neve are known for their flexibility and customization options.
Step 2: Using the Customizer
For many WordPress themes, you can use the built-in Customizer to add two lines of text to your header. Here’s how:
- Access the Customizer: Go to your WordPress dashboard and navigate to
Appearance > Customize. - Find the Header Section: Look for the
HeaderorSite Identitysection. The exact name may vary depending on your theme. - Edit Header Text: If your theme allows for multiple lines, you’ll see options to add text. Enter your main header text in one field and additional text or a tagline in another.
- Save Changes: Click
Publishto save your changes.
Step 3: Customizing Header with Widgets
If your theme supports widgets in the header area, you can use this feature to add two lines of text. Here’s how:
- Go to Widgets: Navigate to
Appearance > Widgetsin your WordPress dashboard. - Select Header Widget Area: Find the widget area designated for the header.
- Add a Text Widget: Drag a
Textwidget into the header widget area. In the widget settings, you can enter HTML to format your text into two lines. For example:

4.Save Changes: Click Save to apply the changes.
Step 4: Custom CSS for Styling
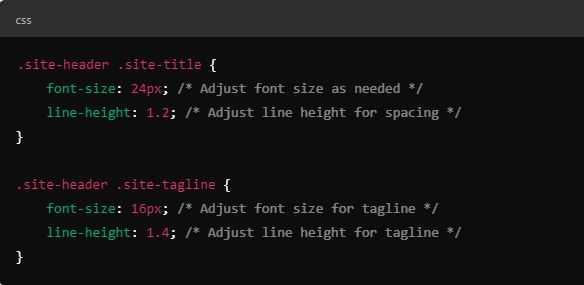
In cases where the Customizer or widgets don’t provide enough control, you can use Custom CSS to format your header text into two lines. Here’s how:
- Access Additional CSS: Go to
Appearance > Customizeand selectAdditional CSS. - Add Custom CSS: Enter the following CSS code to style your header text:

Replace .site-header .site-title and .site-header .site-tagline with the appropriate class names used by your theme. You can use browser developer tools to inspect your header and find the correct class names.
3. Publish Changes: Click Publish to apply your custom CSS.
Step 5: Editing Theme Files (Advanced)
For more advanced users, you can directly edit your theme files to customize the header. This approach requires a basic understanding of PHP and HTML. Here’s a general overview:
- Access Theme Editor: Go to
Appearance > Theme Editorand select theheader.phpfile. - Modify Header Code: Locate the code that outputs the header text. You can add HTML to create two lines of text. For example:

3. Save Changes: Click Update File to save your changes.
Note: Editing theme files directly is risky and can break your site if not done correctly. Always back up your site before making changes.
Final Thought On How to Have 2 Lines of Text in WordPress Header
Adding two lines of text to your WordPress header can enhance the design and clarity of your website. Whether you use the Customizer, widgets, custom CSS, or theme file edits, it’s important to follow best practices to ensure a seamless and professional result. By choosing the right theme, utilizing built-in customization options, and applying thoughtful design principles, you can create a header that effectively communicates your brand’s message and engages visitors.
If you encounter issues or require further customization, consider consulting with a WordPress developer or seeking support from your theme’s support forum. With these steps, you’ll be well on your way to achieving a polished and functional header for your WordPress site.
Interesting Reads:
How to Change the Background Color of Your Header in WordPress
Are WordPress Hooks Coding Mechanisms?
How to Mask URL for Subdomain in WordPress
Last modified: September 20, 2024


