
Adding a Venmo payment option to your WordPress website is an excellent way to streamline payments, especially for small businesses, freelancers, or non-profits that rely on digital transactions. Venmo is a widely used peer-to-peer payment platform, and integrating it with your WordPress site can improve user experience and make it easier for visitors to support your business or cause. In this blog post, titled “How to Set Up Venmo Button on WordPress,” we will guide you step-by-step through the process of adding a Venmo button to your site.

What is Venmo Button?
A Venmo button is a digital payment option that allows users to make payments through the Venmo platform directly from a website or app. When a Venmo button is integrated into a website, it provides visitors with a quick and seamless way to pay using their Venmo account, which is typically connected to their bank account, credit card, or Venmo balance.
Venmo, a mobile payment service owned by PayPal, is popular for its ease of use, particularly on mobile devices. With a Venmo button on a website, users can:
- Make payments for products or services.
- Donate to non-profits or causes.
- Send money for personal or business transactions.
When users click the Venmo button, they are directed to the Venmo app (if on a mobile device) to complete the transaction. For desktop users, the payment is typically processed through PayPal but marked as a Venmo transaction if Venmo is selected as the payment method.
Key Features of a Venmo Button:
- Mobile-friendly: Primarily designed for mobile transactions, integrating with the Venmo app.
- Secure: Payments are processed through Venmo’s secure platform.
- Social Integration: Users can share their payment activity with friends on Venmo, adding a social aspect to transactions.
By adding a Venmo button to your website, you can offer a familiar and convenient payment method for customers who use Venmo regularly.
Also Read: How to Restore WordPress Category
Why Add a Venmo Button to WordPress?
Venmo has gained popularity for its simplicity, social features, and convenience in handling payments. By allowing your website visitors to pay via Venmo, you’re catering to users who prefer mobile-friendly, quick transactions. This can boost conversions, sales, and donations, especially for those who prefer Venmo over other payment methods like PayPal or credit cards.
Benefits of Adding a Venmo Button:
- Convenient Payments: Your customers can easily pay through their mobile devices.
- Fast Transactions: Venmo transactions are quick, enhancing the user experience.
- Trustworthy: Venmo’s integration with PayPal adds a layer of security and trust for your visitors.
- No Additional Fees: Setting up Venmo for personal transactions usually incurs no extra charges.
Prerequisites for Adding Venmo on WordPress
Before starting, make sure you have:
- A Venmo account.
- A WordPress website (self-hosted).
- Access to your WordPress dashboard and the ability to install plugins.
Steps to Set Up Venmo Button on WordPress
Step 1: Enable Venmo Payments in PayPal
Venmo is part of PayPal, so the first step is to ensure that your PayPal account is configured to accept Venmo payments. If you are using a PayPal business account, this feature might already be enabled.
- Log in to your PayPal account.
- Go to your PayPal dashboard.
- Navigate to Settings and find Payment Methods.
- Enable Venmo as a payment option for your customers.
Step 2: Install and Activate a Payment Plugin
To integrate Venmo into WordPress, you will need a plugin that supports payment buttons. A popular choice is the WP Simple Pay or PayPal Donations plugin, both of which support Venmo via PayPal integration.
Option 1: Using WP Simple Pay
- Go to your WordPress dashboard.
- Navigate to Plugins > Add New.
- Search for the plugin WP Simple Pay.
- Install and activate the plugin.
After activation:
- Go to WP Simple Pay > Settings and configure the plugin by connecting it to your PayPal account.
- Under payment methods, make sure to enable Venmo as an option.
Option 2: Using PayPal Donations Plugin
- In your WordPress dashboard, navigate to Plugins > Add New.
- Search for PayPal Donations and click Install Now.
- Activate the plugin once installed.
- Go to Settings > PayPal Donations and configure your PayPal account details.
In both plugin options, once PayPal is connected, Venmo should automatically be available as a payment option for users who have the Venmo app installed.
Step 3: Add the Venmo Button to Your WordPress Site
Now that you’ve enabled Venmo in PayPal and installed a payment plugin, it’s time to add the actual Venmo button to your WordPress pages.
Using WP Simple Pay
- After configuring the plugin, go to WP Simple Pay > Payment Forms.
- Create a new payment form by clicking Add New.
- Customize the form, ensuring Venmo is selected as one of the payment methods.
- Once the form is created, you will get a shortcode.
- Copy the shortcode and paste it into the page or post where you want the Venmo button to appear.
Using PayPal Donations
- Go to Appearance > Widgets.
- Look for the PayPal Donations widget.
- Drag the widget to the area where you want the Venmo button (e.g., sidebar or footer).
- Configure the settings, and ensure Venmo is selected as a payment method.
Alternatively, you can also use a shortcode to place the button on specific pages or posts. After configuring PayPal Donations, you’ll have access to a shortcode that can be pasted into any content area on your website.
Also Read: How to Create Coupons on WordPress Products
Step 4: Test the Venmo Button
Once the button is live on your site, you’ll want to test it to ensure it works correctly.
- Open your website from a mobile device with the Venmo app installed.
- Navigate to the page where the Venmo button is located.
- Click the Venmo button, and ensure the payment process goes smoothly.
Make sure to verify that the payment is processed and that you receive a confirmation both in your Venmo account and on your website.
Step 5: Customize the Venmo Button Design (Optional)
WordPress plugins often allow basic customization of buttons. However, you can add additional styling using CSS to make the Venmo button blend seamlessly with your site’s design.
- Go to Appearance > Customize.
- Navigate to Additional CSS.
- Add custom CSS to change the color, size, or shape of the Venmo button.
For example, you can use the following CSS to adjust the button’s appearance:
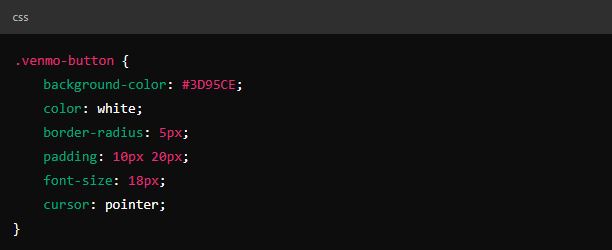
This will create a Venmo button with a blue background, white text, and rounded edges. Adjust the code as needed to match your site’s design.
Step 6: Promote Venmo Payments on Your Site
Once the Venmo button is live, make sure to inform your visitors that they can now use Venmo to make payments. Highlight the new payment option on your website by:
- Adding a banner or notification that Venmo is available.
- Creating a dedicated section on your pricing or donation pages for Venmo payments.
- Promoting the Venmo payment option in your email newsletters or social media posts.
Troubleshooting Common Issues
While adding a Venmo button is straightforward, you might encounter a few challenges. Here are some common issues and how to resolve them:
- Button Not Appearing: Ensure that your plugin is properly connected to PayPal and that Venmo is enabled in your PayPal account.
- Payments Not Processing: Double-check your PayPal account settings and ensure that there are no account restrictions or issues with the plugin configuration.
- Button Not Styled Correctly: If you’re using custom CSS, make sure it doesn’t conflict with your theme’s styling.

Final Thought On How to Set Up Venmo Button on WordPress
Adding a Venmo button to your WordPress site is a simple and effective way to provide a convenient payment option for your visitors. By following the steps outlined in this guide, you can easily integrate Venmo into your website and begin accepting payments seamlessly. Whether you’re running a business, a non-profit, or a personal website, a Venmo button can enhance user experience and increase payment conversions.
Ensure that you test your payment flow, promote the option to your users, and troubleshoot any issues that may arise. With Venmo set up, your site will be ready to accept fast and secure payments from millions of Venmo users.
Interesting Reads:
How to Scan Vulnerabilities on WordPress Using VirtualBox
Top Professional Health & Fitness WordPress themes
Last modified: September 20, 2024