Mastering the WordPress Gutenberg block editor doesn’t have to be intimidating. For those accustomed to the Classic Editor, transitioning to Gutenberg’s block, based layout can initially feel like a significant shift. But once you understand the basics and apply some helpful WordPress Gutenberg Tips, you’ll find it empowers you to create beautifully structured content with ease and flexibility.
This guide is tailor-made for beginners and non-techies who want to get comfortable using Gutenberg without pulling their hair out. Whether you’re setting up a blog, editing a landing page, or managing your business website, Gutenberg offers a more visual, flexible way to build content without needing to know a line of code.
Stick with me, and by the end of this post, you’ll have a bunch of easy, practical tips that’ll make creating content feel smooth, not scary. Let’s break it down, one step at a time.
What is WordPress Gutenberg Editor?
Before diving into the tips, let’s take a moment to understand what Gutenberg is all about.
The Gutenberg editor was introduced in WordPress 5.0 to modernize content creation. Instead of writing in one big text box like in the Classic Editor, Gutenberg lets you build your posts using blocks. Each paragraph, image, heading, button, or video gets its own block.
Think of it like LEGO for websites. You just stack blocks to build your content, and everything stays neat, modular, and easier to manage.
When you open the editor, you’ll notice a few key areas:
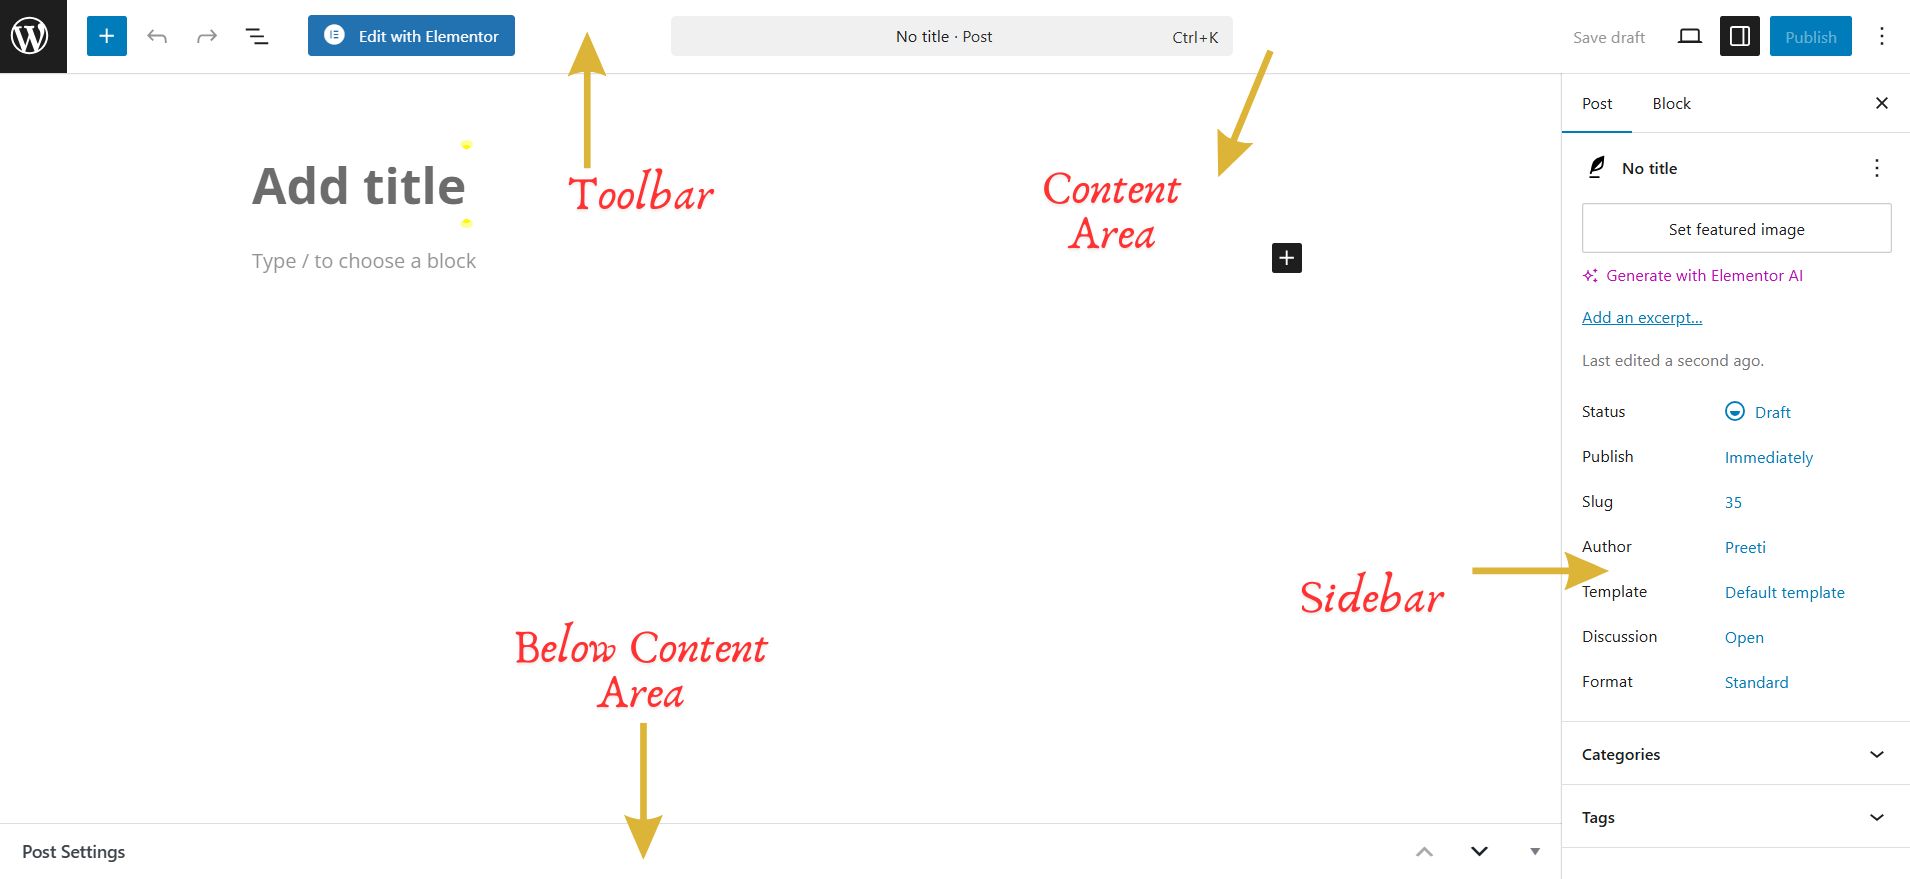
WordPress Gutenberg Editor
1. The Content Area- This is your main workspace. Click the “+” icon or type “/” to add a new block. It’s intuitive, clean, and designed for distraction-free writing.
2. The Sidebar- Toggled via the gear icon in the top-right, this area lets you access post-wide settings like categories, tags, and featured image and block-specific options like alignment, text size, background color, spacing, etc.
3. Top Toolbar- Located across the top of the editor, this contains vital functions: save drafts, preview your post, publish, undo/redo, and more. You’ll also find the block inserter, tools selector, and three-dot options menu here.
4. Below the Content Area- Depending on your active plugins, you might see helpful sections from SEO tools like Rank Math or Yoast, readability checkers, and performance analyzers, all integrated directly into the editor.
Understanding this layout is the first step to using Gutenberg like a pro. Once you get familiar with how blocks work and where everything lives, the rest becomes much easier and more fun! Gutenberg’s strength lies in how visual and intuitive it becomes once you explore its layout. You don’t need to know any code, just click, type, and publish.
Now, let’s dive into the practical tips that will transform your Gutenberg experience
1. Get Cozy With the Slash Command
One of the simplest and most efficient tricks in Gutenberg is using the forward slash (“/”) command. When you’re in a blank paragraph block, simply type “/” followed by the name of the block you need.
For example:
1. Type /image to quickly insert an image block.
2. Type /heading to drop in a heading block.
3. Type /list to start a bullet list instantly.
This approach is much quicker than moving your mouse to click the “+” icon every time, especially when you’re in the middle of writing. It helps you stay focused, minimize interruptions, and build your content fluidly.
The slash command becomes a powerful habit over time, especially when you learn the names of the blocks you use most often. It’s intuitive, clean, and perfect for writers who prefer a keyboard-driven workflow.
Whether you’re building long-form articles or short posts, this shortcut will save you minutes each time, and those minutes add up fast!
2. Discover Keyboard Shortcuts (And Actually Use Them)
You don’t need to be a developer to use keyboard shortcuts. In fact, Gutenberg has some simple ones that’ll save you loads of time:
1. Ctrl + K (Cmd + K on Mac) – Add a link
2. Shift + Alt + Z – Delete selected block(s)
3. Ctrl + Shift + K – Remove a hyperlink
4. Shift + Alt + H – Open the keyboard shortcuts cheat sheet
5. # + Space – Instantly insert a Heading (H1)
Shortcuts are your secret weapon. Over time, even using just a few of these will dramatically speed up your workflow. They reduce clicks and mouse movement, allowing you to stay focused on content creation.
Don’t feel overwhelmed start with just one or two and build up your skills gradually.
3. Use Free Block Plugins for Extra Design Power
Gutenberg has a nice variety of built-in blocks. But if you want to go beyond the basics, like adding testimonials, countdown timers, pricing tables, or tabs, block plugins are your best friends.
Some popular options include:
1. Spectra (formerly Ultimate Addons for Gutenberg) – Adds layout, content, and marketing blocks that help extend the capabilities of Gutenberg. From advanced columns to interactive elements like testimonials, call-to-action blocks, and even responsive visibility controls, Spectra is ideal for users who want more creative control without coding. It integrates seamlessly with popular themes and ensures mobile-friendliness.
2. Kadence Blocks – Great for designing professional-looking pages with advanced customization options like row layouts, background overlays, and custom typography. Kadence Blocks also includes pre-built design libraries and drag-and-drop sections that make it easier for non-techies to build stylish, functional websites quickly.
3. Stackable – Known for sleek design, animation effects, and flexible layout controls, Stackable empowers users to create visually impressive pages. It offers a UI kit-style approach with dozens of ready-to-use block presets, advanced styling, and responsive controls, all tailored to create modern-looking content.
4.Otter Blocks – Lightweight yet powerful block additions that focus on speed and responsiveness. Otter provides useful blocks like pricing tables, countdowns, Google Maps, and contact forms. It’s a solid choice for those who need extra design power without adding bloat to their site.
These plugins open the door to advanced design without needing a designer. You get pre-built blocks that are customizable, mobile-friendly, and easy to integrate, no code needed.
Also Read: Best Gutenberg Block Plugins for WordPress
4. Save Time With Reusable Blocks
If you frequently use the same layout, call-to-action, or design element across different posts and pages, like a newsletter signup form, testimonial block, or product promotion banner, reusable blocks will become your new best friend.
Here’s how to create a reusable block:
1. Select the block or group of blocks you want to reuse.
2. Click the three vertical dots (⋮) in the block toolbar.
3. Choose “Add to Reusable blocks.”
4. Give your reusable block a clear, descriptive name.
Once created, this block will appear in your block library under the “Reusable” section. You can insert it into any post or page with just a few clicks.
When you edit a reusable block, it updates everywhere it’s used, automatically. This saves time and ensures consistency across your site. It’s perfect for site-wide announcements, branded banners, or anything you want to maintain centrally without the headache of manual updates.
For anyone managing content at scale or working on a team, reusable blocks are a major workflow upgrade.
5. Try Different Writing Modes
Gutenberg offers several editor modes that let you customize your writing environment based on your workflow and concentration needs:
1. Top Toolbar Mode – Keeps the block toolbar pinned to the top of the editor. This declutters the workspace by removing floating toolbars, making it easier to focus on writing and editing.
2. Spotlight Mode – Dims the blocks you’re not actively working on, highlighting only the selected block. This mode helps reduce visual noise and is especially helpful when editing long-form content.
3. Fullscreen Mode – Hides the WordPress dashboard and sidebar, giving you a clean, distraction-free writing canvas. It’s perfect for drafting content when you want complete focus.
To switch between these modes, click the three vertical dots (options menu) in the upper-right corner of the editor.
These modes aren’t just cosmetic, they help you adapt the editor interface to match your workflow. Whether you’re aiming for maximum focus or just want a cleaner interface, picking the right mode can make your content creation process feel more relaxed and productive.
6. Collapse the Sidebar for Less Distraction
The sidebar can sometimes feel overwhelming with all its settings and options. To create a cleaner workspace, click the gear icon in the top-right corner of the editor to temporarily hide the sidebar. This removes all formatting controls and post settings from view, allowing you to focus fully on writing your content.
This streamlined, distraction-free layout is ideal during the initial drafting phase when creativity and flow matter most. Once you’re ready to adjust formatting, add categories, or optimize for SEO, simply click the gear icon again to restore the sidebar.
By toggling the sidebar visibility on and off as needed, you maintain full control over your workspace, balancing focus with access to essential tools.
7. Copy and Paste With Confidence
In the Classic Editor, pasting content from Word or Google Docs could turn into a formatting mess. Gutenberg fixes that.
You can now copy and paste text, headings, and even images from your doc into Gutenberg without bringing over weird code. It retains formatting cleanly—bolds stay bold, headings remain headings.
For images, you’ll still need to click “Upload external image” to make sure it’s hosted on your site, but otherwise, it’s smooth sailing. This lets you write in your preferred app and paste it all into WordPress with minimal cleanup.
8. Drag and Drop Images Straight In
Forget the old “Add Media” routine. With Gutenberg, you can simply drag and drop images directly from your desktop right into the editor. When you drop an image, Gutenberg automatically creates a new Image block for you, no need to open the media library or navigate extra steps.
You can drag in multiple images one after another, and Gutenberg will create individual blocks for each or even a gallery block if you drop them together. Beyond convenience, this method encourages a more visual and hands-on approach to content creation. Plus, once images are inserted, you can easily adjust sizes, add alt text, captions, or links directly within each block, keeping everything neat and accessible.
Tip: Use optimized images (WebP or compressed JPEGs) for faster site performance.
9. Change Block Types in a Click
Sometimes, while typing, you might notice that a paragraph would work better as a heading, or maybe a list instead of plain text. Gutenberg makes it easy to switch block types without starting from scratch.
Simply click on the block you want to change, then click the first icon in the block’s toolbar. This opens a dropdown menu where you can select a different block type. You can quickly convert between compatible blocks such as:
1. Paragraph ↔ Heading
2. Paragraph ↔ List
3. Image ↔ Cover
This flexibility is especially handy during editing when your content structure evolves or when you want to experiment with different formats. Instead of deleting and recreating content, just switch the block type instantly, saving time and keeping your workflow smooth.
10. Arrange Your Layout with Columns and Drag & Drop
Creating a two-column layout is simple with the Columns block. It offers several layout options such as two equal columns, a 70/30 split, three equal columns (33/33/33), and more. You can then add text, images, buttons, or any other blocks into each column to build a versatile and organized design.
Additionally, Gutenberg allows you to easily rearrange your content blocks. Use the six-dot handle on the block toolbar to drag and drop blocks wherever you want. For more precise movement, the up and down arrows let you shift blocks one position at a time.
This level of control helps you create well-structured, professional-looking posts and pages without the need for complex page builder plugins. It’s a straightforward way to improve layout and flow directly within Gutenberg.
Final Thoughts
The Gutenberg editor might seem a bit overwhelming at first, especially if you don’t have a tech background. But once you start applying these tips, you’ll work faster, create cleaner, better-looking content, and feel more confident using WordPress.
The key is to practice regularly. Experiment with different blocks and layouts without worrying about making mistakes, that’s how you learn and get comfortable. The more you explore, the easier and more natural it will become.
To take things further, try adding some extra block libraries or plugins. They offer new creative options and help you build more dynamic pages without needing coding skills. With time and a little curiosity, you’ll unlock the full power of Gutenberg.
Interesting Reads
Best Gutenberg Block Plugins for WordPress
WordPress Gutenberg Tips & Tricks
Gutenberg Blocks Every Blogger Should Use
Best Gutenberg Tips for Non-Techies Gutenberg Block Editor Gutenberg Tutorial Non-Techie WordPress Tips WordPress Gutenberg Tips
Last modified: February 11, 2026